
The screenshot is a very useful thing for computer users. In this 21st century, it is a must for all computer users to take a screenshot. This is a guide to help you how to screenshot on a laptop.
What is the Easiest Way to Capture my Screen?
The screenshot is a built-in feature in the Windows Operating System for laptops. This method is best for owners of laptops or desktop computers.
Here are the steps:
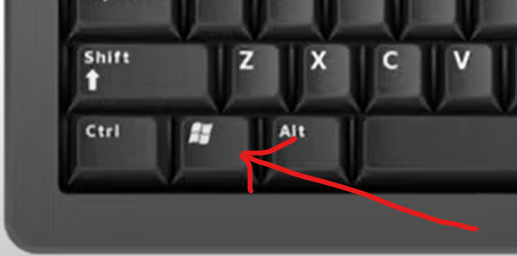

- On the laptop, press the “Windows” and “Print Screen(PrtSc SysRq)” keys. The screenshot will be taken.
- Go to file explorer find screenshots folder to see the captured screenshot
- Go to paint and crop the screenshot for more precise editing.
- Now, save the screenshot to your desktop or wherever you want to save it.
For example, you could need to do this if you want to show someone how to complete a task, or you want to share your laptop’s display with someone. If you want to learn more about how to take a screenshot on a laptop, check out the article below!
What is a screenshot?
Taking a screenshot is taking an image of your screen, often used to capture important information that you want to keep to remember or share with others. Take a look at the following image. When you click it, the image will show you a graphical preview of the image on your screen. Notice that you can’t see the actual image. All you see is a screenshot with a copyright statement. What You Can Do With A Screenshot Taking a screenshot is easy to do, but what can you actually do with a screenshot? Let’s see some practical examples. Record the screen When taking a screenshot, the default setting is taking an image of your screen, but we can do much more than that.
Why do you need to take a screenshot?
You need to take a screenshot if you want to share something that’s on your screen with someone else. It’s also useful for recording bugs and errors, troubleshooting, and for securing evidence. Taking a screenshot is a great way to save anything from your screen. It’s also a good way to show people what they’re missing out on online when they’re too lazy to click on the link you’ve provided them.
You might want to take a screenshot if you want to show your friends what’s on your screen, if you want to capture a screen for documentation purposes, or if you want to save an image from a video. Taking a screenshot is an easy way to save important data on your phone. This includes any chat conversations, websites, images, and more. Any time you need to document something on your phone or iPad, take a screenshot! Screenshots are typically used for capturing images of the desktop, webpages, mobile apps, and other electronic media.
How do I take a Screenshot on My Laptop?
To take a screenshot on your computer, there are 3 ways, the first one is from Shortcut Key –
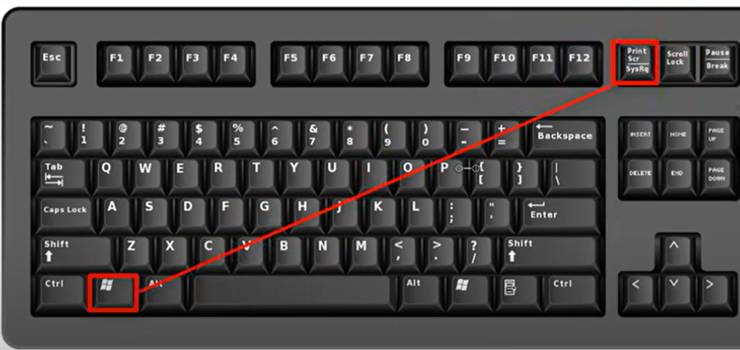
First Way – Press These Windows + Print Screen Buttons Together In Your Laptop. Now the question is where do your saved screenshots go? Not everyone knows how to do it. Yes, many people don’t know the location of their saved/captured screenshots them and they feel frustrated. The answer to this question is complex, but you can figure it out by using this step-by-step guide and some common sense.
How to find your screenshots
Here are three steps to find your saved/captured screenshots by you
Step 1: Find My Computer option In Laptop like this

Step 2: Find the Pictures folder here like this
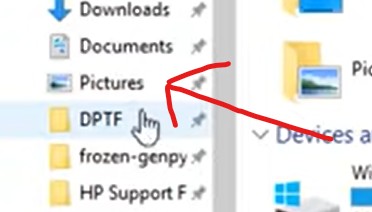
Step 3: Here you will see the Screenshots option and in this folder, you will find out captured screenshot by you. Here you will find out all screenshots captured by you and you can use them according to your need.

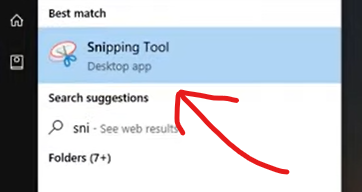
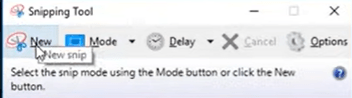
Second Way – The second method to take a screenshot on your laptop is Snipping Tool
If you are using windows 7,8 or windows 10 on your laptop you can use this feature or you can say tool. This is an inbuilt laptop tool you can use this tool to take screenshots of a particular part/portion of your laptop. For this, you have to search in your window “Snipping Tool”. Here you will see like this
Now you have to open this tool and tap on new like this
Now you can select any portion of your laptop screen to capture that particular part in your screenshot. After that, this tool automatically shows you that particular screenshot, and you can save it in any folder by any name giving to it.
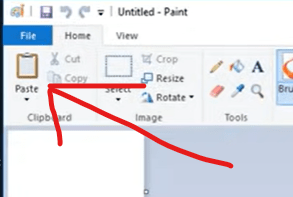
Third Way – The third way to take screenshots on your laptop is “Print screen and paint“
As I have already told you where is the print screen button in your laptop. So simply press this button after that you have to search for paint in your windows search bar.
Step 1: Open paint tool/software
Step 2: Press paste option in paint tool like this
Step 3: After doing this click on the file option which is the exact top on the paste option you can see in the previous image
Step 4: Here you will find out the save option to save your screenshot and you can use this saved image as a screenshot.

So, these are some inbuilt software/tools in your laptop of any brand Acer, XP, Lenovo. You can use these steps in every Windows operating system laptop. These are the best and easy ways to take screenshots on your laptop
Also Read: How To Lose Weight On Your Face and Neck: Reduce Puffy Eyes & Circles
Conclusion
After reading this post, you will have complete knowledge about how to take a screenshot on your laptop. Hope that our guide to taking screenshots for windows XP, Acer, Lenovo, and all laptops is useful to you. If you have any suggestions or suggestions, please comment below. Thank you for reading the article. Please share this guide with your friends on social media if you found it useful. If you liked the article, please share it on your social media pages. We will be happy to see your comments below.


